Centos7 使用 Certbot 申请 Let`s Encrypt 免费SSL证书
· 阅读需 4 分钟


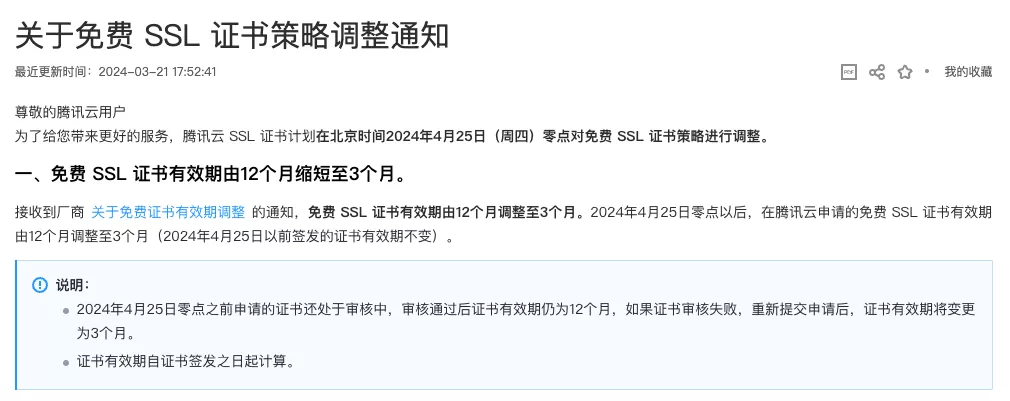
腾讯云:关于免费 SSL 证书策略调整通知,免费 SSL 证书有效期由 12 个月缩短至 3 个月。
2024 年 4 月 25 日零点以后,在腾讯云申请的免费 SSL 证书有效期由 12 个月调整至 3 个月(2024 年 4 月 25 日以前签发的证书有效期不变)。更多见:https://cloud.tencent.com/document/product/400/104538
我的域名 SSL 证书都是从腾讯云申请的,因为有效期是一年,一年替换一次就行了,不用老折腾。但是,但是他变成了三个月...这也就意味着我需要每三个月就要上后台折腾一次,还还有点麻烦的。
所以不得不找其他的方法,所以有了接下来的内容:
环境:
我在 centos7 上用 Docker 部署的 nginx。所以需要注意目录的映射。
首先在服务器上安装 Certbot 服务
sudo yum install epel-release
sudo yum install certbot python2-certbot-nginx
生成证书命令格式如下:
sudo certbot certonly --webroot -w /usr/share/nginx/html -d yourdomain.com --email youremail@example.com --agree-tos
需要调整的参数:
- -w: 请求的路径,他们会向
domain/.well-known/acme-challenge/*这个路径请求来验证域名所有者。所以这个请求的路径需要映射到这里。 - -d:需要申请 SSL 证书的域名。
- -email: 自己的邮箱 📮
需要设置下域名认证的请求路径:
location /.well-known/acme-challenge/ {
    root /usr/share/nginx/html/certbot; #修改自己的路径
}
执行命令生成证书
sudo certbot certonly --webroot --webroot-path=/opt/myapp/nginx/html/certbot -d blogtest.lichenghao.cn --email 1710322553@qq.com --agree-tos
其中/opt/myapp/nginx/html/certbot映射的是 docker 中的/usr/share/nginx/html/certbot
IMPORTANT NOTES:
- Congratulations! Your certificate and chain have been saved at:

/etc/letsencrypt/live/blogtest.lichenghao.cn/fullchain.pem

Your key file has been saved at:

/etc/letsencrypt/live/blogtest.lichenghao.cn/privkey.pem

Your certificate will expire on 2024-07-11. To obtain a new or

tweaked version of this certificate in the future, simply run

certbot again. To non-interactively renew *all* of your

certificates, run "certbot renew"

- If you like Certbot, please consider supporting our work by:

Donating to ISRG / Let's Encrypt: [https://letsencrypt.org/donate](https://letsencrypt.org/donate)

Donating to EFF: [https://eff.org/donate-le](https://eff.org/donate-le)
生成的证书存放路径:/etc/letsencrypt
所以需要将该路径映射进 nginx 的容器中。完整 docker-compose.yml 文件如下:
services:
    nginx:
        image: nginx:1.21.5
        restart: always
        container_name: nginx
        environment:
            - TZ=Asia/Shanghai
        ports:
            - 80:80
            - 443:443
        volumes:
            - ./html:/usr/share/nginx/html/
            - ./conf:/etc/nginx
            - ./ssl:/usr/share/nginx/ssl
            - ./logs:/var/log/nginx
            - /etc/letsencrypt/:/usr/share/nginx/letsencrypt
        networks:
            my_network:
networks:
    my_network:
修改域名的 nginx 配置文件,启用证书
server {
        listen 443 ssl;
        server_name blogtest.lichenghao.cn;
        # 证书位置
        ssl_certificate     /usr/share/nginx/letsencrypt/live/blogtest.lichenghao.cn/fullchain.pem;
        ssl_certificate_key /usr/share/nginx/letsencrypt/live/blogtest.lichenghao.cn/privkey.pem;
        # SSL配置
        ssl_session_timeout 5m;
        ssl_protocols TLSv1 TLSv1.1 TLSv1.2;
        ssl_ciphers ECDHE-RSA-AES128-GCM-SHA256:HIGH:!aNULL:!MD5:!RC4:!DHE;
        ssl_prefer_server_ciphers on;

        # 代理服务
        location / {
          root /usr/share/nginx/html/app;
          index index.html index.htm;
        }
		# 域名认证
        location /.well-known/acme-challenge/ {
            root /usr/share/nginx/html/certbot;
        }
        access_log /var/log/nginx/blogtest.access.log;
        error_log /var/log/nginx/blogtest.error.log;
}
server {
        listen 80;
        server_name blogtest.lichenghao.cn;
        # 将请求转成https
        rewrite ^(.*)$ https://$host$1 permanent;
}
Let’s Encrypt 的证书有效期只有 90 天,因此你需要设置自动更新证书的机制。certbot 提供了这样的命令来更新证书
certbot renew --quiet
所以我们来设置定时任务来执行更新即可。
crontab -e
文件中设置定时任务,保存即可
0 2 * * * ? certbot renew --quiet # 每天上午两点执行